Page 8 of 11

Re: Edit your pictures.

Posted: Thu Jul 30, 2015 2:26 am
by Tinman
I have an unusual problem with my camera. When I take a "selfie" the camera makes me look really old in the photo. What am I doing wrong?

Re: Edit your pictures.

Posted: Thu Jul 30, 2015 2:41 am
by GHOSTHUNTER
Tinman wrote:I have an unusual problem with my camera. When I take a "selfie" the camera makes me look really old in the photo. What am I doing wrong?
Ah yes, a common problem. It seems at some time you have taken a picture of an old Man and the Camera's face recognition function has not re-adjusted, so it remembers the last face it saw. There will be a rest button somewhere, tweak this and pictures of yourself should come out showing you correctly as a young stud that we all know you are.

Ghosty.

Re: Edit your pictures.

Posted: Thu Jul 30, 2015 3:19 am
by Tinman
Kevin, I made the adjustments you recommend to the camera, but I must have overdone the settings ...

Image

Re: Edit your pictures.

Posted: Thu Jul 30, 2015 10:48 am
by fixer
Tinman wrote:Kevin, I made the adjustments you recommend to the camera, but I must have overdone the settings ...

Image
I had the same problem

Too Blue pictures.

Posted: Thu Aug 13, 2015 4:38 pm
by GHOSTHUNTER
I have posted the information below in responce to some members digital pictures having that horrible Blue cast which if the subject matter is also Blue, makes it difficult to see.

A problem with your White Balance...

White balance is simply a "digital filter" which corrects an image for the color of the light source in order to record and display an image with the correct colors. That's the simple explanation, but there's a lot of digital technology and physics behind it. I'll start out with basic, practical information.

Most digital cameras, from high end DSLRs to simple P&S digicams, have a number of white balance settings such as Auto, Sunny, Cloudy, Shade, Flash, Fluorescent, Custom and Kelvin. When you're rapidly moving from indoors to outdoors and from sun to shade and you want the camera to try to do most of the work for you, choosing Auto white balance is a good idea. While not perfect, the camera will analyze the image and use built in algorithms to make a best-guess at what digital filter will give the most accurate colors. The filter setting it selects may be slightly different on every shot, even shots taken under the same lighting, but generally it gives pretty good results.

If you know what your lighting is, e.g. full sun, cloudy sky, deep shade etc., you can set white balance to one of those values. In this case the digital filter the camera uses to obtain the colors will be exactly the same from shot to shot. As long as your lighting doesn't change the images should be consistent in color.
The White Balance menu..jpg
The White Balance menu..jpg (32.86 KiB) Viewed 12189 times
You can also choose one of the preset options if you don't want "correct" colors. For example if you want the image to look "warmer" and you are shooting in sunlight, you could select the "cloudy" white balance. If you want it to look warmer still you could select the "shade" white balance. On the other hand if you were shooting in sunlight but wanted the image to look cooler, you could select the "fluorescent" color balance. A higher K value makes images look warmer, a lower K value makes images look cooler.

My own preference would be to leave the white balance set to Manual, because all my pictures are taken in doors in bright natural light, but not bright Sunlight. If all you have is bright Sunlight, cut it down by hanging up some Grey or Cream coloured bed sheets to diffuse the light, or if you have enough of it, some paper.

GHOSTHUNTER.

Re: Edit your pictures.

Posted: Fri Aug 14, 2015 12:15 pm
by misterpop
Nice explanation..Now I know a bit more than when I got up and thats my aim every day.Thanks Kevin.

Re: Edit your pictures.

Posted: Wed Oct 07, 2015 10:57 am
by kerbside
Thank you Ghosty but as you can see I have got the picture on now, my friend Trevor showed me how to do it, I do it just the same as before but instead of left clicking I have to right click, so easy when you know how :lol: :lol:

George T.

Re: Edit your pictures.

Posted: Wed Oct 07, 2015 4:07 pm
by GHOSTHUNTER
OK George, hoping it was something simple, glad you are back to normal, take care.

Ghosty.

Re: Edit your pictures.

Posted: Wed Oct 07, 2015 6:10 pm
by fixer
For anyone using an android mobile device there is a very simple app called photo resizer that I am using works very well and keeps the resized pictures in its own file ideal for posting
I don't know if it's also available for apple systems

Re: Edit your pictures.

Posted: Fri Jan 29, 2016 11:10 pm
by tractorboy
Posting Photos to the Forum

This is a guide for Mac users but may be applicable for Windows.

When posting to the forum it is best to have a photograph that is easy to view.
To enable this there are 2 issues to consider:

1. Resolution of the photograph - quality when taking the photograph.
2. Size - best fit for forum page when you export the photograph ready for upload.

1. Resolution
By default cameras are set to their highest resolution, enabling high definition photographs suitable for printing (these can be 5 MB or larger).
For general viewing on the forum this is not required (unless specific features, such as axle end, needs to be viewed - in which case you could take a high definition photo and then crop to specific area area of interest).

Most cameras have a FUNCTION set button/mode where photo resolution can be altered.
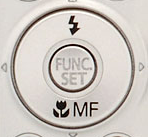
Screen Shot 2016-01-30 at 9.15.20 am.png
Screen Shot 2016-01-30 at 9.15.20 am.png (42.32 KiB) Viewed 11842 times
This brings up a screen to alter resolution
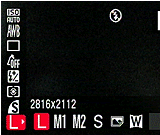
Screen Shot 2016-01-30 at 9.13.48 am.png
Screen Shot 2016-01-30 at 9.13.48 am.png (36.02 KiB) Viewed 11842 times
L = large to S = small
A few experiments with different resolution sizes will give you some indication of your camera's capabilities.
Take some photos of the same model with different resolution settings.

2. Size
When you come to export your photograph (e.g. onto desktop) for uploading to the forum there is usually an option to select the size.

I have iPhoto as my imaging tool so when the camera is connected to the computer the photos upload to iPhoto.
Here I can straighten, alter colour balance, brighten, crop, etc.

When the photograph is ready for exporting onto the desktop
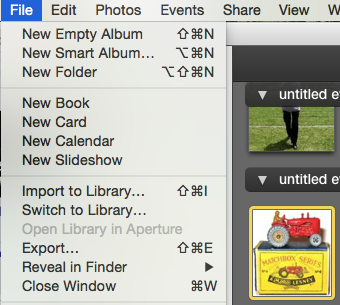
Screen Shot 2016-01-30 at 9.43.52 am.png
Screen Shot 2016-01-30 at 9.43.52 am.png (100.8 KiB) Viewed 11842 times
There are options to select JPEG quality and export size
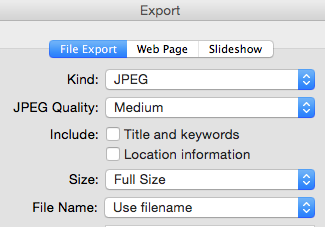
Screen Shot 2016-01-30 at 9.17.14 am.png
Screen Shot 2016-01-30 at 9.17.14 am.png (31.67 KiB) Viewed 11842 times
Here Medium JPEG quality selected
Screen Shot 2016-01-30 at 9.17.37 am.png
Screen Shot 2016-01-30 at 9.17.37 am.png (28.27 KiB) Viewed 11842 times
The final step is to select the size of the photo to be uploaded
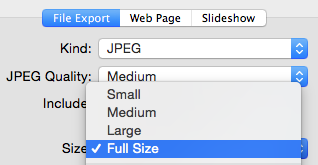
Screen Shot 2016-01-30 at 9.18.06 am.png
Screen Shot 2016-01-30 at 9.18.06 am.png (28.45 KiB) Viewed 11842 times
2 example of photograph sizes at Medium JPEG quality
Large
04 A5 Massey Harris Tractor large.jpg
04 A5 Massey Harris Tractor large.jpg (57.75 KiB) Viewed 11842 times
Small
04 A5 Massey Harris Tractor small.jpg
04 A5 Massey Harris Tractor small.jpg (27.04 KiB) Viewed 11842 times
As you can see Large require some scrolling - for most post I would use Small size. Had I selected the Maximum JPEG quality the photograph would have exceed the page size (hence those large photographs and tiny text that are sometime seen).

All through this post I was able to click the preview button to view how the post was looking and check photograph sizes.

Hope this is of help when taking photographs and uploading to the forum.