
The first thing you need is a work area dedicated to the project. If you are a bachelor, no problem. If you are married, you better check with the boss before you stake out that work area! Here are some of the basic tools needed to get started.
Tools:
Dremel.
Dremel accessories.
Cordless drill & a small bit index.
Small screw drivers, straight and Phillips.
Dental pick set.
Needle file set.
Set of tweezers.
Set of nail sets (small, med, lg).
Small pliers set: needle nose, angled needle nose, duck bill (aka flat nose) and cutters.
Razor knife. I like the break off blade type.
Paint brushes: Large for dusting & very fine for detail work.
Veneer caliper.
Magnifying lamp.
Spring clamps (various sizes).
Small to medium hemostats are very helpful tools.
Supplies:
Super glue: Gel or regular.
5 Minute two part epoxy.
Elmer’s Washable School Glue (water soluble Elmer’s white glue).
Tooth picks.
Small zip lock bags.
Future brand floor polish.
Pencils.
Black Sharpie
Silver Sharpie
Quart paint can(s) and lid(s).
Smaller containers if using an air brush.
Lacquer thinner.
Alcohol.
Q-Tips.
Some lint free clean rags.
Sand paper, 220 & up.
Taking the model apart.
Once you have looked over the casting and parts for defects, you need to take everything apart. For models with base plates, you will need to drill the rivet or rivets. You want to use a drill bit that is slightly larger than the outside edge of rivet head. Should the drill bit contact an axle or an axle is in the way, remove that axle prior to drilling the rivet (see chapter on removing wheels & axles).
Drill until the head of the rivet has been removed. You should be able to see the rivet post and the outline of the hole in the base plate. If you cannot tell where the rivet ends and the base begins, inspect the rivet under magnification. You should also be able to move your finger tip across the rivet and not feel any sharp or protruding edges.
It is OK to use a small screw driver or pick to pry the base off the rivet stem. Do not use excessive force as things are easily bent and broken. Sometimes, the rivet stem is mushroomed as well as the head of the rivet. It might require a couple of taps using your small nail set. Place the tip of the nail set in the center of the rivet post and tap gently with a small hammer. I use my thigh or my stomach as a cushion to avoid damage to any other part of the casting and that also makes a good “third hand.” A spring loaded center punch is also very useful, just be careful as they generate a bit of force.
Some castings have a base plate with axle supports and some have axle supports that are part of the body casting. Remove the wheels and axles on these supports next (see chapter on removing wheels & axles).
Removing wheels and axles.
Rounded axles have a large end and a small end. The small end is the “peened" or "spun” end and is always the end we will modify using the cylindrical grindstone on the Dremel. Make sure that the wheels slide freely on the axles. Push the large head end of the axle tight against the supports and draw the wheel or hub on the peened end in towards its support. This will expose a maximum area of the end of the axle. Grind the peen off, leaving only a smooth axle end.
Once the peen is ground away and the end of the axle is smooth, that wheel will slip off and free the entire axle. Place the wheels and axles into a labeled zip lock bag and set these aside.
If the wheels (or hubs) are stiff on the axle and do not move, you can use a small socket as a drift to move the wheel (or hub) on the axle. I use a small ¼” drive socket for this task. If the axles are so rusted that the wheels are frozen, do not try to force them to move. If you do, the wheel will nearly always crack or split.
When axles are badly rusted, I soak the base (complete with wheels/axles) or casting in CLR or LimeAway. This stuff is corrosive so be careful not to soak too long. Two or three hours is all that most need. If the axles are severely rusted, it might take more like six to eight hours of soaking. Be sure to monitor the base or casting for damage when soaking for longer times. Some people have had luck using Coca Cola for this purpose.
Rinse the base or casting thoroughly and then you can probably get the wheel or hub to spin freely using your fingers. Use the socket only if you can't get the wheels to move. If you still can not free the wheels to spin, sacrifice the axles by cutting them as close to the wheel as possible. I use a Dremel for this as it cuts the cleanest with the least distortion.
Removing window glass.
On many castings, the window insert is installed with the same size rivet as the base plate. Use the same drill bit to drill off the rivet head holding in the glass insert. Go slow, be careful and do not apply excessive pressure. We only want to free the plastic insert and not crack or break it with downward pressure on the drill.
Follow the same tips as drilling the base rivet, especially the trick of feeling the rivet head for remaining sharp remains. Once the head is removed, you can work out the insert with your fingers. Place light pressure on the front and back window surfaces and use a rocking motion to pop out the insert. Some trucks will have only an exposed windshield and will need to be coaxed from the inside as well. Put the window insert in the parts bag.
Stripping paint.
Paint removal from the casting and the base can be done in a number of ways. My preferred way is using aerosol “aircraft” paint stripper. It sprays on and washes off with soap and warm water.
Here are other mediums that will strip paint from metal.
Brake Fluid.
Simple Green (straight and not diluted).
Oven Cleaner.
Lacquer Thinner.
Acetone.
All of the above require soaking in the solution. The exception is oven cleaner and it works best when the casting is slightly warmed first. Oven cleaner is a poor substitute for spray on paint removers and it's more expensive.
Some paints are harder to remove than others and may require soaking for several days. The spray on aircraft stripper works within minutes of application and works far better than any of the above.
If you choose to soak, I recommend placing the chemical in a quart paint can and sealing the lid for the duration. New quart cans (with lids) can be bought at almost any paint store. Be aware, many of these products are very flammable and produce harmful fumes.
A small stiff plastic bristle brush and a stiff bristle tooth brush are excellent tools to use when washing off the stripper of your choice. Use as much elbow grease as needed. These will help remove paint from stubborn and hard to reach areas. Dental picks and even tooth picks get into tiny engine details and other tight spots.
I picked up an old Water Pic dental cleaner and it makes a perfect mini pressure washer to blast the softened paint out of tight spots. Once the casting and or base is stripped, clean the parts with warm soapy water to remove any trace oils. It’s best to use a brush while doing this procedure too. However, use a separate brush that is dedicated for final cleaning and keep it apart from paint stripping/cleaning brushes. Once you have done the final wash, set the casting and/or base aside and allow to thoroughly dry.
Casting repairs and customizing.
Now that the paint is removed, the bare casting can receive repairs or custom modifications. One question that’s often asked; can I solder zinc? The answer is no… and yes. You CANNOT solder bare zinc based castings. If you copper plate the affected area or areas where work needs to take place, then you CAN solder the metal parts. Investing is a unit that can copper plate Zymak is fairly expensive. You now have to plate all parts before you can solder. There is another system that allows you to solder or braze pot metal and Zymak. It's called "Muggy Weld" and works with their proprietary flux and brazing sticks. It requires a small butane torch to perform the work. This system in not cheap either, however it works very well and is a one step process.
In most cases, a good two part epoxy will produce the same results with a lot less work than plating and soldering or the Muggy Weld system. My favorite two part epoxy is JB Weld and there are several other good ones out there. Be sure to allow plenty of time for the epoxy to cure before sanding and painting. A minimum of 48 hours of cure time is needed to make sure that the epoxy does not out-gas and damage your new paint work. It also sands best when fully cured.
I want to mention that most white metal cast replacement/reproduction parts are made of pewter and similar white metal alloys. The various casting alloys are softer than zinc and zymak. It bends easier, breaks easier, sands and/or files away faster. Nearly all will also melt under the tip of a soldering gun. Some of the tin/bismuth alloys melt at temps as low as 160*. If you do use the Muggy Weld system, you will have to make your own metal parts from scrap zymak, steel or aluminum (it seems to do OK brazing dissimilar metals). The heat required to solder with this system will melt and destroy replacement white metal parts.
These same white metal parts almost always need to be cleaned of excess flash and might need additional shaping for a correct fit. It’s best to work a little at a time and continue to dry fit the part until it’s just right.
Filler putty: There are some excellent filler putty type products made just for modelers. Some of these are two part and others are one part and some are fairly expensive. To save a few bucks, some use only two part epoxy as a filler putty. Others use Bondo and still others use spot putty. I like the red spot putty, the very same spot putty used in 1:1 scale paint and body work. I don't like using Bondo on small areas and it's not made for tiny spots.
It’s best not to rush any of these fillers and allow anywhere from 12 to 24 hours for them to cure. The better the cure, the better the finished results will be when you shape them.
After the filler is cured, sanded and shaped, you can apply a sandable primer. I like very fine steel wool as a sanding medium for the primer. You can also achieve excellent results with ultra fine sand paper and wet sanding is a plus. Some filler products are difficult to prime and seal. When coated with the final paint, the filled areas can show up as dull spots (as they soak up the paint's sheen). The best thing I've found to seal spot putty and modeling putty is a coat or two of clear lacquer. It seals the putty and the finish coat is glossy and has a uniform sheen.
Patience.
Now is as good a time as any to mention patience. If you are short on patience, this may not be the hobby for you. I’ve seen some fine work ruined by people rushing and not allowing epoxy glues, fillers, primers and paints to cure. Remember, on average, it takes thirty days for nearly all paints to fully cure. Many paints dry to touch in as little as four or five minutes and others are slower. Time is your friend when assembling painted parts, so let them dry as long as possible.
Painting.
You can scan the web and other sites and come up with a ton of useful painting information for scale models. I will try to touch on the basics and some more important issues. There are two main ways to paint; an air brush or spray cans. Each has some advantages, but the air brush produces the best consistent results. It takes some practice and experience to get good results with both ways of application.
The biggest problem with all purpose aerosol paint cans is the spray applicator tip. It is sized with a pattern capable of being used on a wide range of objects and surfaces. Generally speaking, none of these stock tips are the best for small 1:64 scale cars. The larger the scale, the easier it is to work with spray paint cans.
Spray paints range from a buck a can all the way up to seven to eight dollars for a small hobby size can. Expensive does not always mean better quality, but in general, quality does follow price. Regardless, I’ve found a few paints in the $1.00 - $2.00 price range that are quite good.
Edit: Paint prices have increased quite a bit since this was written, In some places, the continued use of certain hydrocarbons is taxed and increases the end users price for paint.
The best general purpose paints in the mid price range are Krylon, RustOleum and Duplicolor. Plasti-kote also makes paints in a mid price range. They have some excellent colors and they perform well when cured.
Plasti-kote brand hobby paints can be difficult to work with and slow to cure. Slow curing means the finish is tacky and soft for an extended time. This paint may need to cure for several days (as much as a week or 10 days) before it is safe to handle and reassemble painted parts and/or castings. There is an upside to slow curing as it allows the paint to lay out in a very even and smooth finish.
Not all paints are compatible with each other. Incompatibility can result from how hot the vehicle is (such as lacquer based paints), how fast the paint cures or be due to different modifiers like epoxies. The results of incompatibility are almost always the same, the finish will wrinkle or check soon after starting to dry. When this happens, just stop working and strip the casting back to bare metal and begin again. Make note of which finishes did not mesh so as to not repeat the problem.
It’s important to read each can of paint and adhere to the instructions about applying second or multiple coats. Some may have a window of one or two hours in which additional coats can be applied. Often, when that window expires, they recommend as much as a five day wait for additional coats. Failing to observe this window almost always results in a ruined paint job.
Primers are important. The best general purpose primer for scale toys is automotive primer. Using primer will always give you a better end finish. Primers should not be confused with base coats and many colors require a base coat of silver, gold or white to give the topcoat the desired finished look. Lacquer top coats are required for some finishes and many general purpose paint finishes can benefit from a nice glossy topcoat of clear.
Like everything else, practice makes perfect. Practice with your air brush or paint cans to get a solid feel for how each works and patterns. There is old advice on spray painting: Several thin coats are always better than one thick one. That is sage advice.
For those who prefer to use only aerosol cans: Assorted size and pattern replacement tips are sold. These can greatly improve the application and finish. While they still don’t provide the control of an air brush, they do make a big improvement for the rattle can user.
Polishing plastic windows or window inserts.
The first thing to do is clean the window insert with warm soapy water using a soft brush. Wipe dry with a soft cloth and then inspect the windows. If the windows look pretty decent after cleaning, a coat of clear acrylic will shine them up. The best product I have ever found for windows is Future floor polish. Future is widely used in the modeling business and can even be used to clear coat finished paint work.
Many window inserts have a hole in the center where they fit on a rivet or an alignment post. Place a pencil point into that hole to make a holder tool for the insert. I prefer to dip the windows into the Future and then blot excess (from the edges) using a Q-tip. I use a coffee cup as a holder for the pencil, inserted eraser first. The acrylic dries in an hour or less and then you can take them off the pencil.
For scratched or scuffed windows, you will need to polish them first. There are numerous polishing systems sold for plastic and acrylic. These can be two or three part systems, meaning two to three applications, one for each step in the system. Such polishing kits or systems can be bought where plexiglass is sold, at boat supply stores and online. The same polish used to restore automobile head lamp plastic lenses works great too.
I prefer to wet sand the windows with sandpaper. The deeper the scratch or scratches, the more coarse the paper you need to start with. Start out with 600 grit and work up to 1000 grit. Then use the polish and a buffing wheel on the Dremel, go slow and keep the surface wet to avoid problems. Wash, dry and dip in the Future acrylic. On some badly damaged windows, I’ve started with paper rougher than 600 grit (400 for example).
A word of caution! I’ve seen too many guys break out the Dremel and put on a buffing wheel. Next, they then apply some tooth paste or other polishing compound and hit the window plastic with the buffing wheel moving at high speed.
The result is almost always a ruined window insert with a nice groove melted into it or a similar ruined spot from the polishing wheel. When you push up the rpms and set the wheel to the plastic, you generate too much heat very quickly. If you must use the dremel or other power tools to buff plastic; keep the speed low and the surface wet with polishing liquid and/or water. The lowest setting possible is the key to not destroying the window plastic.
Re-assembly.
If the casting has windows, I replace the window insert first. I like to use a drop of Elmer’s School Glue (the water soluble white glue) to secure the plastic insert to the roof of the casting. If you ever need to remove the windows, just soak the casting in warm water for a couple of minutes and the glue lets loose.
I use the same glue to place wheels back on the axles. I use a small needle applicator to place the glue inside the axle opening on the inside of the wheel or hub. A tooth pick will also make a good inexpensive applicator.
With the first wheel already on the axle, slide the axle into place and install the 2nd wheel. Position the glued wheel on the axle and dab the exposed tip with a damp Q-tip to remove excess glue. Set the base or casting aside for an hour or until the glue is dry.
Once the window insert is back in the casting you can install the interior and/or any other loose parts like doors, trunk, hood, engines, etc. The base is the last part to go on. The base can be secured with a pop rivet, a screw or glue. Super glue is not advised if you have a painted metal base. The glue and its fumes will damage the paint finish. Super glue fumes can form and ruin a plastic window insert in seconds.
Rivets.
You can buy small rivets from several sources that specialize in selling reproduction & custom parts and supplies for 1/64 scale cars. Some of these are pretty expensive. You can also find very small pop rivets at a commercial fastener supply house. To use any of these, the original rivet post will have to be drilled with a pilot hole.
Screws.
Small self tapping screws are an inexpensive and quick way to secure the base. Screws have the advantage of being removable where rivets and glue are semi permanent. Often, they are called model train screws because of their common use with HO train modeling. Just as with rivets, a pilot hole has to be drilled in the original rivet shaft. Do not over tighten as they can easily strip out of the soft zinc shaft (cheap screws will also snap off at the head).
Helpful tips:
Support the casting for painting:
Use a small post, spindle or clamp to hold the casting body while painting. Alligator clamps, small spring clamps and the like will grip rivet posts and should be fixed to a base so that the casting can be set down to dry when done. Pencils, 16 penny nails, bamboo skewers will also make inexpensive posts. Posts should also have a base.
Paint chip charts.
You can make a nice “chip chart” using small samples of each paint applied to a solid surface. I like to use the Formica samples that you can get at home improvement centers. They make a nice size sample and already have a hole to hang them on a reference board.
The hard plastic surface accepts paint very well and there is plenty of room on the back to make notes about the source of the color. You can arrange the samples on a peg board or make a display board using plywood and finish nails for hooks. They become a quick reference for color selection or matching.
I assign a number to each sample and place the same number on the can, jar or spray can of paint. Once I choose a color off the sample board I can then go directly to the same numbered can, jar or spray can. I also keep a written record (in a small pocket notebook) which uses the same numbering scheme. In the notebook, I make a record of everything I will need to replenish that particular color or paint when the supply is used up.
Masking for two-tone paint work:
Masking tape is inferior for small detailed work like a 1:64 or smaller casting. Several hobby sources sell a very thin masking film which works much better. Another good tip to prevent paints from “bleeding” under the tape or film is to place a second base coat on the casting once the masking is applied. A coat of clear will also perform the same function. This will seal the edge and help prevent bleed over.
Using nail polish as paint:
Yes, it works well in most cases. However, it’s best to not combine nail polish with other more standard paints as a reaction can easily ruin your work. In other words, either stick to all nail polish or all paint on the same casting.
Keeping tools handy:
I keep my most commonly used tools right on top of the work bench. Dremel accessories go into a small wood block (a small section of 1x4) which has many small holes drilled into the block. All the tips and accessories sit upright and in plain view which makes for easy use. I use another block for dental picks, small screw drivers, needle files and detail paint brushes.
This puts all the common tools in plain sight, organized and ready for fast access. Each block is covered with a cardboard back to make each hole “blind” and allow the entire block to easily be picked up and moved. The rest of my tools are kept in two oak machine tool chests. Those oak chests are perfect for small tools, with their felt lined small drawers, and they look nice too.
I own four Dremels and keep a different commonly used tip in each. This speeds up disassembly and modifications without having to stop to change tips/bits. Each one hangs on a hook, side by side and this keep them out of the way and quickly accessible for the next use. These hooks are on the front of my work bench and the cords all remain under the work surface for safety and greater ease of use.
No one needs that many Dremel style tools (one will work just fine), it just makes things easier. Two of them are brand name Dremels and the other two are inexpensive cheapies. They do perform at different levels and there are times when one needs more power for a specific task.
Compressed air:
While this is only a must if you use an airbrush, it’s very handy for drying parts and cleaning parts. I have a small air hose with a blow gun on a retractable reel which is mounted right over the work bench. I find it all too handy but I own so many different size compressors that this in not even an additional expense for me. You can use the airbrush compressor to blow off parts, but they provide very little CFM at low pressure.
This “guide” is a work in progress and I encourage everyone to email me your favorite tip or technique for inclusion in future revisions.
For those outside the USA, the paints I mention are probably not going to be available to you. However, the advice about re-coat times (the window of time within additional coats can be applied) and compatibility issues are still very important.
Restoration Handbook
Restoration Handbook
It might be time to start my "Bucket List."
-
gpwcollector
- Posts: 200
- Joined: Sun Sep 15, 2013 5:53 pm
- Location: LHC, AZ USA.
Re: Restoration Handbook
Great to see the return of the "Handbook" can't do without this info 
Dave
So. Cal. USA.
So. Cal. USA.

Re: Restoration Handbook
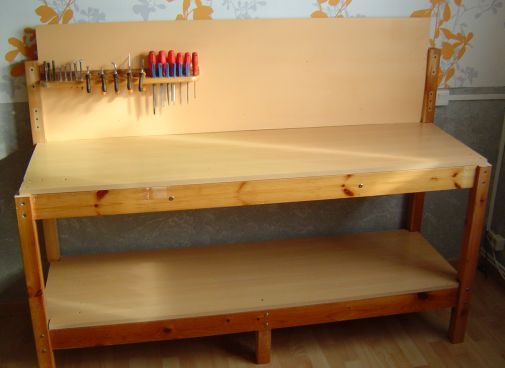
Now that marriage is no longer a problem.. I have finally gotten around to building myself a dedicated work area, constructing my hobby bench from materials that I found and recovered on "big trash day"- which is once a month here- a true treasure trove of items and material that people throw away, which I then collect and re-purpose. Thus the cost to build the bench was 0.00Tinman wrote:The first thing you need is a work area dedicated to the project. If you are a bachelor, no problem. If you are married, you better check with the boss before you stake out that work area! Here are some of the basic tools needed to get started.
I have begun to add a few tools, listed on Joe's list... it's coming along
zBret

Re: Restoration Handbook
That's a nice job, I like the idea of a "Big Trash Day." You do know that we'll expect factory sized production from you with facilities like that 
John
There's nothing regular about wheels
There's nothing regular about wheels
-
GHOSTHUNTER
- Moderator
- Posts: 12249
- Joined: Sun Sep 15, 2013 4:12 pm
Re: Restoration Handbook
I also like the idea of ''Big Trash Day'', don't know of any in my area, but would love to go to one.
Ghosthunter.
Ghosthunter.
Re: Restoration Handbook
Theres a similar sort of thing over here,you phone the council that you have rubbish(another mans riches) and they give you a date
when they will pick it up from the street.
some times good stuff.
Gary.
when they will pick it up from the street.
some times good stuff.
Gary.
-
tractorboy

- Posts: 670
- Joined: Fri Sep 27, 2013 9:25 am
- Location: Auckland
- Contact:
Re: Restoration Handbook
Nothing nicer than a nice clean, well organised work area - a great start.
Looking forward to seeing the fruits of your labours.
Looking forward to seeing the fruits of your labours.
"What one loves in childhood stays in the heart forever." ---Mary Jo Putney
Rodger
Rodger