First Resto

Any brand, any year, show us your projects.
User avatar
zBret
Posts: 886
Joined: Fri Sep 20, 2013 9:31 pm

First Resto

Post by zBret »

Having gotten my workbench pretty well set up, I decided to have at, my first full on restoration.
Not to long ago, I acquired this rather worn 17b, in a group lot . Considering it's sad state and poor condition, I thought it would make for a good choice for a first attempt.. Thinking that I couldn't make it much worse and at the very least figured I could make it look better, than it did when I started.

Image
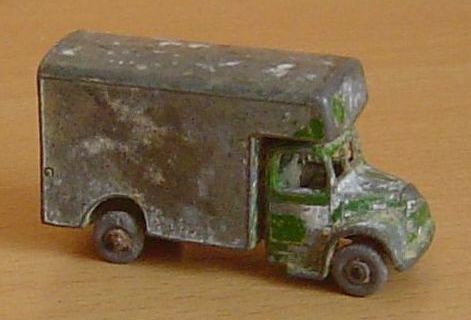
As one can see from the photo, this 17b has seen better days. From what I can tell, it was originally the more rare, dark green version of the 17b, with grey plastic wheels. Now most it's paint gone and the casting is heavily corroded with white rust. The wheels were frozen solid on the axles and would not, turn. In fact the axles themselves were so heavily rusted they would not turn either. In addition it had a pretty good dent in the side above rear wheel arch on the right hand side.

First step was into a white vinegar bath with the casting. One could immediately see the the effect of the vinegar on the white rust, as it began to bubble off. There was one stream of bubbles coming from where the radiator cap is, looked like the ole van was boiling over...I let the casting soak overnight. The next day I removed it and found that the axles could now turn freely in their mounts, though the wheels, were still frozen solid to the axles. The wheels could not turn, as the axles had corroded so much that they had swelled inside the plastic wheels, locking them firmly in place. As they were so tight to the axles the vinegar solution couldn't not get in there to loosen them, so they rested stuck. I thought on the matter a bit and decided to try using a hair dryer to warm up the wheels on the axles, hopefully softening them and expanding them a bit so that I could get them to spin and eventually remove them. Slowly the wheels began to loosen and turn, I was then - after a little filing on the axle ends, to remove the ridge of the spun end, was able to remove the wheels. The wheels and the axles went back into the vinegar for an extra soak.

Image
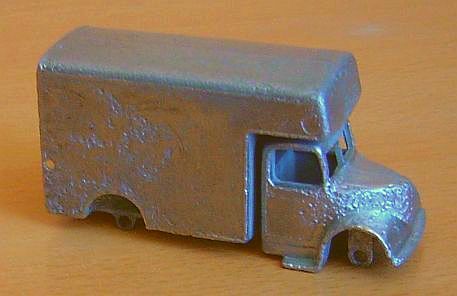
This pic is after the vinegar soak and removal of the wheels and axles. Using a small C-clamp and following up with a bit of hammer and dolly work, I was able to get the dent out from above the rear wheel arch. The vinegar soak actually removed what was left of the original dark green paint. One can see that white rust had really attacked the casting. Most of the fine detail from the original casting has been wiped out.

Image
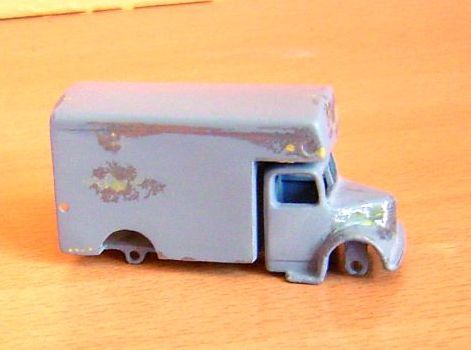
This photo is after a few primer/filler coats, sanding in between coats. Things are beginning to smooth out on the casting and its coming along. Putting the detail back is going to be a challenge though.

Stay tuned for further progress..

zBret
GHOSTHUNTER
Moderator
Posts: 12249
Joined: Sun Sep 15, 2013 4:12 pm

Re: First Resto

Post by GHOSTHUNTER »

For your first restore project you certainly chose a serious case of neglect with the natural path to self destruction well and truly started!

Leaving axle-wheel combinations in soak is the answer but personally would have used a penetrating oil or liquid (WD-40 in the UK). But hopefully what you have used will eventually do the same trick.

I am also looking forward to how you intend to replicate the finer details now missing, as I know how I would try to do it... :D

Ghosthunter.
Malibu
Posts: 1001
Joined: Tue Nov 04, 2014 12:20 pm

Re: First Resto

Post by Malibu »

There are definetly some easier models to restore than this one. Respect.

Ghosty how would try to bring the finer details back on the model?

Stephan
GHOSTHUNTER
Moderator
Posts: 12249
Joined: Sun Sep 15, 2013 4:12 pm

Re: First Resto

Post by GHOSTHUNTER »

Oh, no, no, no, no...no, I don't give away my secrets that easily, we'll have to wait and see what zBret does with his... :D

Ghosty.
Malibu
Posts: 1001
Joined: Tue Nov 04, 2014 12:20 pm

Re: First Resto

Post by Malibu »

GHOSTHUNTER wrote:Oh, no, no, no, no...no, I don't give away my secrets that easily,
If you tell me how I´ll tell you how to win the Lotto.
Deal?

Stephan
User avatar
zBret
Posts: 886
Joined: Fri Sep 20, 2013 9:31 pm

Re: First Resto

Post by zBret »

I agree with you Stephan, this one not exactly easy and is definitely presenting some challenges. I thought the model was worthy of a restoration though and want to see if I can bring it back to a better condition. In a way I suppose isn't saying much, as it couldn't get much worse. The way I look at it though, I have set myself for success, as anything I do to it would be an improvement from when I started.
We'll see how I do :)

Of course our Ghosty won't let the cat out of the bag regarding his tips and tricks - I wouldn't have it any other way - I myself am curious to see if I get it right ;) and If Ghosty would have gone about it the same way. This detailing phase takes some time though, so will just have sit tight for a bit and see how I do... I'm sure Ghosty won't mind :P

zBret
GHOSTHUNTER
Moderator
Posts: 12249
Joined: Sun Sep 15, 2013 4:12 pm

Re: First Resto

Post by GHOSTHUNTER »

Right, for starters...

To copy the finer detail it will be nice if you have a good model to copy, if not get some decent picture of the model. To replicate trim-lines which may be shut lines or chrome trim on the real vehicle, you get some scrap model kit runners, hold over a lit candle, turn slowly until it heats and becomes soft, then gently move your fingers away from each other which will result in the soft plastic stretching into a really fine plastic rod.

The thickness of this rod depends on how fast you move your fingers and how far apart you go. Do it fast and put Two feet between the fingers and it will be very fine, ideal for making miniature wiper arms and blades among many other smaller items.

If you do the same with polythene plastic it will remain flexible when cooled down.

Do the same with various insulation from electrical cable and you can make really fine tubing.

Roll a length of solder under a steel rule on a solid surface and you'll have something that when shaped and glued to a model can be polished to give a bright finish like 'Chrome'. Wrap it round a modelling paint brush, cut them with a sharp modelling knife and you'll have loads of small rings which can be used for all sorts of detail trimming on models and again can be polished.

If we need to replace a door handle on the model zBret is working on,note where it is on the good model or in the picture. Drill a tiny hole in as close position and stick a piece of plastic rod or fine solder into the hole and bend it back onto the surface of the door. It could be left like this and secured fully with superglue, but a better look would be to gently pres the steel rule against the solder to give it a flat profile so it does not stand as proud and then secure with glue. Once this is primered and painted you will not know it is a hand made detail.

Now, describing all this does not mean each person is going to get good results, it is going to depend on each person's modelling skills, but practice makes perfect and from the work we are seeing on this forum, I have a lot of confidence for you all to be able to replicate my ideas or even improve on them.

Replacing broken window frames or central pillars in windscreens has been mentioned elsewhere and while on first impressions looks to be a daunting problem is really very easy and you can use plastic, solder or metal office staples for the job.

Right, I'm ready for those winning lottery numbers please...

Ghosty.
User avatar
zBret
Posts: 886
Joined: Fri Sep 20, 2013 9:31 pm

Re: First Resto

Post by zBret »

Thanks Ghosty, very interesting tips. I hadn't thought about trying to use plastic the way you described. I can see from your detailed description though, how that would work as well.

My material of choice for replicating the details and casting lines is,thin strands of wire, which has been sourced from various scrap pieces of lamp and speaker wire, removing the insulation and then taking and using the individual strands, also using a bit of wire from bag ties which is easy to bend and shape. So very similar technique, just a different material.

As you also suggested, I have have been using a nice clear photo of a 17b (shown below) which I found on Nicks site as a guide.
One can see from this photo the detail, that has to be put back in. There are casting lines around the box and over the rear wheel arches, as well as on the door and below the bonnet and then of course there will be the grill to redo. Some of these details are very small and I'm finding that I really need to get a magnifier as the old eyes ain't what they used to be. Making slow progress, but progress non the less. I will post some more photos as I get a it further along with things.

zBret
Attachments
A Factory Original 17b
17b5.jpg (30.98 KiB) Viewed 1844 times
GHOSTHUNTER
Moderator
Posts: 12249
Joined: Sun Sep 15, 2013 4:12 pm

Re: First Resto

Post by GHOSTHUNTER »

Yep, I keep a large stock of old electrical wire and cable ties. sheets and scraps of plasticard, plastic packaging, the foil trays from jam tarts etc, etc.

Using wire the way you mention is something I did on a Rio Rolls-Royce Phantom II after removing it first with files and sanding because I felt it was not accurate enough!

Image
All the fine coach trimming along the waistline on this Rio has been replaced by fine Copper wire. Wiper arms, door handles door hinges all done with scrap wire or plastic.

Yes this is a 1/43rd scale model, but this type of modelling can be applied to any model in any scale.

Ghosthunter.
Malibu
Posts: 1001
Joined: Tue Nov 04, 2014 12:20 pm

Re: First Resto

Post by Malibu »

Hi,
GHOSTHUNTER wrote:Using wire the way you mention is something I did on a Rio Rolls-Royce Phantom II after removing it first with files and sanding because I felt it was not accurate enough!
That Looks perfect.
I wonder how you glue this plastic strips to the model witout having glue everywhere.
GHOSTHUNTER wrote:Right, I'm ready for those winning lottery numbers please...
Hm - I was asking you to tell me how to do it - now you told everybody here - that wasn´t the deal so sorry no numbers.

Stephan
Locked